

")


")


Reverse Seared Rib of Beef
The technique we used here was a reverse sear where we slowly raised the temperature of the whole piece of meat by cooking it at 110°C until its internal temperature was 48°C (5°C below rare). We then fired up the BBQ to about 250°C and seared the outside of the rib of beef before resting it for about 15 minutes and serving in slices.
The initial cook was indirect, we used the diffuser with the stainless grid on top. To that we added the meat and cooked slowly until the core temperature reached 48°C (5°C lower than the temperature we were aiming for as the last 5°C would be achieved when we seared the meat).
We then removed the difuser and opened the air vents to raise the temp to 250°C. We used the stainless steel grid to sear the Rib of Beef for about 3 minutes on each side.
We learned that salting the meat beforehand isn’t necessary.

Dirty Steak vs. Seared Steak
The recipe is here for the dirty steak.
Cooking the steak dirty adds a really meaty flavour to the steak. It’s also a little controversial when you have friends over. Very little ash sticks to the steak. I think it’s a great technique.
You can cook veg this way too. Daniel Clifford at Midsummer House in Cambridge cooks celariac and beetroot directly on the coal, it’s divine. DJ BBQ does an amazing dirty carrot recipe in his book Fire Food.

Roast Cauliflower with Truffle Oil and Black Sesame Dressing
The technique here was to cook on the back side of the baking stone. All I did was wipe down the back of the baking stone with a dry paper towel or foil.
We set up the BBQ to cook at 180-200°C.
I cut the cauliflower into about 7mm thick slices all the way through the cauliflower. I removed most of the really thick bit of stalk before cooking. I then added a touch of oil and some maldon salt to the slices (on both sides) and placed them directly onto the baking stone. We then cooked them for about 5 minutes on each side until they start to turn golden brown.
To this we added the dressing. A great addition is to sprinkle toasted black sesame seeds to give a little crunch.

Lamb Rack, French Trimmed
This would be a great recipe to do with the cauliflower as it also can be cooked on the back of the baking stone (or a ceramic plancha).
Again we setup the BBQ in an indirect configuration with the diffuser. We set the temperature of the BBQ to 180-200°C.
I would normally score the fat of the lamb rack in a diagonal pattern with the scoring about 3/4 cm apart. I would then added a tiny bit of oil and generously seasoned the lamb with maldon salt.
I then cooked this directly on the baking stone, fat side down for about 15-18 minutes. At the last minute, we turned the lamb to add a little bit of sear to the edges.
I used a Thermapen to probe the meat. For medium rare, we were looking for an internal temp of 58°C. The lamb will continue to cook while it’s resting so take it off about 3°C before (55°C for medium rare).
Always rest your meat wrapped in foil.

Focaccia
This Italian bread is really simple to make and an easy first go at baking on the BBQ.
Make a batch of my basic bread recipe and let it rise. Knock it back and split into two portions. Push out each of these dough balls into the bottom of a 30cm x 20cm baking pan, lightly oil the top and cover with cling film. Put to one side to allow it to rise again.
When ready, poke it with your fingers to make the dimples. Drizzle generously with olive oil and sprinkle with salt and herbs (we used rosemary).
Setup your BBQ for an indirect cook with the diffuser, stainless steel grid on top and the baking/pizza stone on top of that. Get your BBQ to 220°C and give the baking stone a while to heat up, probably 20 mins..
Cook your focaccia in the tin on the baking stone for about 15 minutes until it’s both golden brown on the top, but also crunchy on the bottom. Allow it to cool on a wire rack before serving.

Cedar Planked Salmon
The plank is designed to smoulder while the salmon roasts on top of it, taking on the wood flavour as it cooks.
Soak the planks in water for at least 1 hour before you use them. You can also soak them in other liquids such as:
- Beer, lager or cider.
- A dilution of citrus juice.
Get your BBQ to 180°C in a direct setup with just the stainless or cast iron grids. Dry the side of the plank you will put the fish on, for about a minute, by placing it cooking side down on the BBQ.
Take your salmon fillets and place them skin side down onto the plank. Use a set of tongs to move the plank onto the Egg. I put a slice of lemon onto the salmon to show the smoke, not to add flavour. It looks pretty though.
Cook until the salmon has firmed up enough to show it is cooked (about 8-10 mins). Take off the plank with the tongs and put onto something heat proof.

Apple Tarte Tatin
This was our last cook of the day.
We used one of the Tefal pans to make a caramel before addding the peaches, butter and pastry. The caramel was cooked direct and we then baked it direct. You could always do the first stage on the hob inside.
Don’t stir the caramel, it’ll crystallise. Just leave it until the colour starts changing.
Be careful with the flip at the end, hot caramel burns. Make sure you’re not under pressure with a big audience :-).
Technique
What temperature should I cook at?

Cooking temp guide from AmazingRibs.com
The Stall or Plateau explained
The best resource on this is at AmazingRibs.com. Give it and the other articles a read. It’s a superb site.
Cooking Beef Short Ribs
Beef short ribs are very easy to cook. However you want to make sure they have a good fat content. You Kosher ribs may have a little less moisture content if they have been salted. To cope with this, I would therefore try and cook them as a full rack, called a Jacobs ladder. I would also recommend cooking them in foil for the last part of the cook with some stock to moisturise them.
I’d setup the BBQ at 110°C and smoke the ribs with a bit of cherry or sweet chestnut. Cook them for a few hours until the ribs start to go into the plateau at around 70-75°C. At this point I would wrap the ribs in foil tightly, adding a couple of tablespoons of beef stock.
Then cook them until they reach 88-92°C and probe really easily.
As we’ve wrapped the ribs I would expect the whole process to take about 5-6 hours.
Using a DigiQ or other forced air controller
When using a DigiQ, Flameboss, HeaterMeter or other forced air controller you should make sure the BBQ is setup so that the device has to push air into the BBQ to maintain the temperature. The biggest mistake made with these controllers is to leave the temperature regulator too far open as this will allow air to flow naturally. This could lead to the temperature in your BBQ getting too hot.
The DigiQ itself has a damper, this should be set to the smallest opening if doing a low and slow cook. This will restrict the airflow a little. I usually close my temperature regulator almost completely closed once the BBQ has reached 110°C. This will force the fan to have to push air, and therefore oxygen, into your BBQ to maintain the temperature.
Cured meats and the Pro Q cold smoke generator
If you’d like to make your own charcuterie or smoked salmon then you can use the BBQ to smoke meat using a ProQ Cold Smoke Generator.
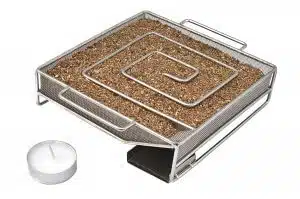
This will allow you to smoke meats for up to 10 hours per fill. You can use different wood dusts and I find the ones from HotSmoked.co.uk to be the best. You can even try discount code MP10 to get 10% off.
To cure salmon I use a 50/50 mix of sugar and salt for between 4 and 6 hours on the salmon. The recipe is here.
To get into curing meats there are a number of books. I started after reading Tim Haywards book, Food DIY.
What charcoal should we use?
Sustainable quality charcoal isn’t easy to get in the UK at a cheap price.
Some good providers:
- Stag Charcoal – I’ve used this and like it a lot. It’s British too.
- Green Olive Firewood Charcoal – Get the longburn charcoal. It’s had good reviews and the occasional bad one. I’ve not used it.
- Oxford Charcoal – superb single species stuff. Not cheap.
Rest your meat
There is a great article discussing whether this is a myth but I still like to rest my meat: http://amazingribs.com/tips_and_technique/mythbusting_resting_meat.html
Reverse Sear
Using Planks Multiple Times
A great technique for prologing the life of your planks is to soak them overnight in lieu of them being soaked in just water, add flavourings to the water. Great flavourings are:
- Lemon and lime – lovely citrus flavours go well with fish
- Beer, cider or lager
Now instead of using the planks directly over the charcoal, use your diffuser with the stainless steel grid and place the planks onto the stainless grid. You’ll still get the wood flavouring but it won’t burn your planks away.
Remember always place your planks on to a heat resistant surface when you take them off the BBQ.
Using a cool box to rest meat
Once your meat is cooked, wrap it in several layers of aluminium foil and place it into your cool box. Cover then with bath towels and then shut the lid. Make sure you use old towels as you’ll never get the smell of BBQ out of them!
Cooking Dirty Carrots
I talked briefly about cooking dirty veg and in particular carrots. The recipe is really simple.
Place several carrots directly on the coals with your BBQ set around 180°C. Turn them every three of 4 minutes. They will start to char on the outside. Once they start to soften up and bend a little you can take them off and slice them into about 2cm long sections. Cut them on the bias, it just looks cooler. Cook them in a frying pan (Tefal Ingenio) with a teaspoon of cumin seeds, 2 tbsp balsamic vinegar and 4 tbsp of maple syrup or runny honey. Season with salt and pepper once cooked so the carrots have a little bit of bite.
Equipment
Probe Thermometer
Every BBQ chef should have a Thermapen 4. It’s by far the best probe thermometer on the market. It’s super accurate, fast reading and waterproof and has a backlit screen for use when it’s not so bright outside.
You can buy it in my shop and I have set you up with a discount code to use at the checkout, CLASS10.

Meater+
I used the block version of this during the class. Unfortunately it’s not going to launch until the summer. I love the Meater+ as its app will estimate when your meat will be cooked and tell you when to take it off your BBQ so that it doesn’t overcook. I wouldn’t be without a Meater.
They are now available to buy in my store and I hold stock of these. Use discount code CLASS10 on checkout.

Pans with handles that clip on and off
They’re a product from Tefal that I picked up several years ago in France before I got into the Big Green Egg as they were perfect for the camper van. They’re called Tefal Ingenio and are available in the UK now from Amazon.
The handle clips on and off easily so you pop the pan in the Egg and take the handle off. I use mine all the time. They’re great for cooking tarte tatin.
Just be careful with non stick ones that you don’t get them too hot as the non-stick will start to break down.

Recommended Cook Books
Fire Food
Just launched by DJ BBQ (Christian Stevenson). DJ BBQ does a lot of cooking with Jamie Oliver. There are some fabulous and easy recipes in here.
There is a whole section on dirty cooking (cooking directly on the charcaol). I have done the dirty carrots and can highly recommend them. The book was only published recently.

Berber & Q
I’ve only just got this so I haven’t had time to try too many of the recipes but from what I’ve seen it looks excellent.

Meathead
This is by Meathead Goldwyn, the man behind the AmazingRibs.com website. It’s got some really good stuff on technique as a well as some good recipes. It’s available on Amazon from this link.

Food DIY
Tim Hayward is a Cambridge based food writer, restauranteur and chef. He’s judged on the BBQ scene. His book contain loads of great curing recipes as well as BBQ stuff. I really love it and use the recipes all the time. It’s available on Amazon from this link.
