

")


")


Recipes
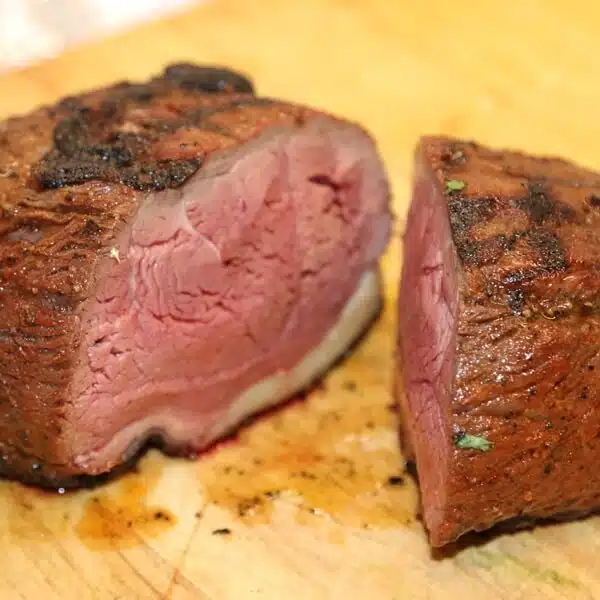
Picanha
The technique we used here was a reverse sear where we slowly raised the temperature of the whole piece of meat by cooking it at 110°C until its internal temperature was 53°C (5°C below medium rare). We then fired up the BBQ to about 250°C and seared the outside of the picanha before resting it for about 15 minutes and serving in slices.
The initial cook was indirect, we used the heat deflector with the stainless grid on top. To that we added the meat and cooked slowly until the core temperature reached 53°C (5°C lower than the temperature we were aiming for as the last 5°C would be achieved when we seared the meat).
We then removed the heat deflector and opened the air vents to raise the temp to 250°C. We used the stainless steel grid to sear the Picanha for about 3 minutes on each side.

Vertical Roast Chicken
The photo shows a chicken roasting on the vertical roasting rack I have for my Big Green Egg, we used your ceramic one though.
We filled your ceramic stand about 1/3 full with beer. You could use wine, stock or fruit juices, even Coca Cola. Don’t overfill it though as we’re after the base getting hot and steaming the chicken. We used a circular drip pan to collect the juices. With a bigger pan you could roast your whole Sunday lunch.
Set your Joe to 180°C, the same temp you would cook a chicken in the oven at. Use the heat deflectors and set your chicken in a pan on top of the stainless steel grid. You will need to cook the chicken for about the same time you would cook it for in the oven. This is going to be around 1:15 to 1:30 depending on the size of the chicken.
The chicken is ready when the thickest part of the meat reaches 75°C.
Rest your chicken wrapped in foil for 20 to 30 minutes after it has cooked. This will give you time to use all the lovely juices to make a gravy.

Dirty Steak
Dirty steak is my favourite way of cooking steak in our house. Compared to Picanha though I think the consensus was that the Picanha was better.
Cooking the steak dirty adds a really meaty flavour to the steak. It’s also a little controversial when you have mates over. Very little ash sticks to the steak. I think it’s a great technique.
You can cook veg this way too. Daniel Clifford at Midsummer House in Cambridge cooks celariac and beetroot directly on the coal, it’s divine.

Lamb Rack, French Trimmed
This would be a great recipe to do with the cauliflower as it also can be cooked on the back of the heat deflector.
Again we setup the Joe in an indirect configuration with the deflector plates. We set the temperature of the Joe to 180-200°C.
I scored the fat of the lamb rack in a diagonal pattern with the scoring about 3/4 cm apart. I then added a tiny bit of oil and generously seasoned the lamb with maldon salt.
I then cooked this directly on the ceramic plate, fat side down for about 15-18 minutes. At the last minute, we turned the lamb to add a little bit of sear to the edges.
I used a Themapen to probe the meat. For medium rare, we were looking for an internal temp of 58°C. The lamb will continue to cook while it’s resting so take it off about 3°C before (55°C for medium rare).
Always rest your meat wrapped in foil.

Roast Cauliflower with Truffle Oil and Black Sesame Dressing
The technique here was to cook on the back side of the heat deflector. All I did was wipe down the back of the heat deflector with a dry paper towel or foil.
We set up the Joe to cook at 180-200°C with the plate setter feet down.
I cut the cauliflower into about 7mm thick slices all the way through the cauliflower. I removed most of the really thick bit of stalk before cooking. I then added a touch of oil and some maldon salt to the slices (on both sides) and placed them directly onto the heat deflector. We then cooked them for about 5 minutes on each side until they start to turn golden brown.
To this we added the dressing. A great addition is to sprinkle toasted black sesame seeds to give a little crunch.

Focaccia
This Italian bread is really simple to make and an easy first go at baking on the Joe.
Make a batch of my basic bread recipe and let it rise. Knock it back and split into two portions. Push out each of these dough balls into the bottom of a 30cm x 20cm baking pan, lightly oil the top and cover with cling film. Put to one side to allow it to rise again.
When ready, poke it with your fingers to make the dimples. Drizzle generously with olive oil and sprinkle with salt and herbs (we used rosemary).
Setup your Joe for an indirect cook with the heat deflector, stainless steel grid on top and the baking/pizza stone on top of that. Get your Joe to 220°C and give the baking stone a while to heat up, probably 20 mins..
Cook your focaccia in the tin on the baking stone for about 15 minutes until it’s both golden brown on the top, but also crunchy on the bottom. Allow it to cool on a wire rack before serving.
Planked Salmon
The plank is designed to smoulder while the salmon roasts on top of it, taking on the wood flavour as it cooks.
Soak the planks in water for at least 1 hour before you use them. You can also soak them in other liquids such as:
- Beer, lager or cider.
- A dilution of citrus juice.
Get your Joe to 180°C in a direct setup with just the stainless or cast iron grids. Dry the side of the plank you will put the fish on, for about a minute, by placing it cooking side down on the Egg.
Take your salmon fillets and place them skin side down onto the plank. Use the grill gripper to move the plank onto the Joe. I put a slice of lemon onto the salmon to show the smoke, not to add flavour. It looks pretty though.
Cook until the salmon has firmed up enough to show it is cooked (about 8-10 mins). Take off the plank with the grill grippers and put onto something heat proof.

Apple Tarte Tatin
Instead of using flat peaches, we substituted them with eating apples. Otherwise we stuck to the flat peach tart tatin recipe. We could have done with the BBQ being slightly hotter to brown the apples and caramel but we were running out of charcoal.
Be careful with the flip at the end, hot caramel burns. Make sure you’re not under pressure with a big audience :-).
Technique
What temperature should I cook at?
The following chart shows meat cooking temperatures depending on your cut of meat and your preferred level of cook:

Cooking temp guide from AmazingRibs.com
How do I light my Kamado Joe?
We started the class looking at how to light your Kamado Joe. There was a little mould inside but this is normal if you don’t use it often. The key is to make sure the charcoal is dry when you light it after a while.
When you light the BBQ the key is to put in enough charcoal and then light the middle. Make sure for the first 10 minutes the bottom vent and the dome are wide open, giving it maximum oxygen.
When to use the deflector plates?
The two half moon deflector plates are used to push heat up and around the dome of your Kamado Joe. As I explained in the class, if you think about how you would cook whatever you’re cooking in the kitchen then apply the following:
- Food you would cook on the hob – don’t use the deflectors. This is called direct cooking.
- Food you would cook in the oven – use the deflectors. This is called indirect cooking. Typically this is larger chunks of meat, cakes…
What are the best cuts of steak?
This is a very personal thing as buying a steak is a normally a compromise between flavour and texture. However it is worth stating that it’s almost always better to buy steak from a good butcher than a supermarket.
The process of ageing meat allows the naturally present enzymes to break down the muscle, making it more tender. Most supermarkets only age their meat for 21 days, a good butcher will go 28 days or beyond, sometimes over 100 days. During this process the meat will dry out and shrink, loosing weight, so a dry aged steak will probably cost more per kilo as the butcher has had to store it and it’s also lost water content meaning the same piece of meat is now lighter.
Ageing will take place on whole joints before they are cut into steaks. Individual steaks shouldn’t be aged.
Having said all that here are my takes on different cuts:
- Rump steak – probably one of the most flavoursome cuts but because this muscle works harder than most of the others here, it can be a little tougher. My local butcher though will tell you it’s one of his favourite cuts because of the taste.
- Picanha – this is the rump cap. Cooked as we did it during the lesson, a reverse sear, this is my favourite joint.
- Sirloin – slightly more tender than rump but with slightly less flavour. Not too fatty. I normally avoid these.
- Rib-Eye – the next step up from Sirloin but with a great fat content. Think of fat as flavour. Even if you don’t eat it you can render it in a hot pan or vaporise it by cooking dirty. This will add flavour back to your steak. This is my go to steak when not cooking a Picanha.
- Fillet – Super tender as this muscle does next to nothing. However there isn’t much fat so there isn’t much flavour. If texture is your number 1 then this is the steak for you.
- T-Bone – this is bone with the fillet on one side and the sirloin on the other. It looks great.
- Cote de Boeuf – a bone in rib of beef, it’s just stunning but very expensive. It’s the ultimate steak if money is no object.
- Forerib of beef – this is normally a 3 or 4 bone rib joint. Do it as a Sunday roast or for Christmas. My favourite way of doing it is the reverse sear it. A 4 bone rib will cost about £130-£150.
- Beef short ribs or Jacobs Ladder – these are from the tougher part of the animal and need to be slow roasted for 8 or 9 hours. People rave about them but I can take or leave them, I’d much prefer most of the cuts above.
The Stall or Plateau explained
We talked about how the tougher cuts of meat will go into a stall at around 65°C when they are cooked. This occurs as the outer layers of the meat dry out and form a bark.
The best resource on this is at AmazingRibs.com. Give it and the other articles a read. It’s a superb site.
What settings are needed for specific temperatures?
Setting the temperature on your Kamado Joe will vary slightly from the Egg. However for a large Big Green Egg the settings are roughly as per the guide I have put together.
Rest your meat
Always remember to rest your meat after cooking it. This gives the meat structure time to relax and reabsorb moisture. It will make your meat taste far more tender and juicy.
There is a great article discussing whether this is a myth but I still like to rest my meat: http://amazingribs.com/tips_and_technique/mythbusting_resting_meat.html
Reverse Sear
When you do a reverse sear as we did for the Picanha, bring the temperature of the meat to 5°C less than you require it to be when finished. This is because the sear process will raise the temperature by another 5°C. For example, for a medium cooked steak you want it to be 63°C, therefore cook it until is has an internal temperature of 58°C before searing it.
Using Planks Multiple Times
A great technique for prologing the life of your planks is to soak them overnight in lieu of them being soaked in just water, add flavourings to the water. Great flavourings are:
- Lemon and lime – lovely citrus flavours go well with fish
- Beer, cider or lager
Now instead of using the planks directly over the charcoal, use your ConvEGGtor (plate setter) feet up with the stainless steel grid and place the planks onto the stainless grid. You’ll still get the wood flavouring but it won’t burn your planks away.
Remember always place your planks onto a heat resistant surface when you take them off the Kamado Joe.
Using a cool box to rest meat
A cool box makes a brilliant tool to store your meat while it’s resting. It will keep it hot for longer periods too. I’ve kept 13kg of pork piping hot for over 10 hours using a cool box.
Once your meat is cooked, wrap it in several layers of aluminium foil and place it into your cool box. Cover then with bath towels and then shut the lid. Make sure you use old towels as you’ll never get the smell of BBQ out of them!
Cleaning your Kamado Joe
The Joe doesn’t need to be cleaned that often but it is essential. If you ever notice your Joe isn’t heating up properly it’s likely to need a good clean.
Clean the ash from your Joe every five or so cooks. Use the ash pan to do this.
Every 12-15 cooks take the whole of the inside of your Joe out and brush down with the dustpan and brush. Some people hoover out their Joes but if you do this make sure it is cold, I had a customer set her Henry on fire.
Making Smoked Salmon
Home made smoked salmon is to die for and so easy. You’re going to need a Pro Q Cold Smoke Generator and some sawdust. The steps to make it are:
- Mix 250g of table salt (PDV Salt if you can get it) and 250g sugar.
- Place a layer of the mix on a tray and place your salmon fillet on it skin side down.
- Cover the salmon with the remainder of the mix so it is completely covered.
- Leave to cure in the fridge for 4-6 hours.
- Wash off the cure and place the salmon back in the fridge on a wire rack for 12 hours to go sticky.
- Smoke with the cold smoke generator for 8-10 hours inside your Egg.
- Return to the fridge to mature for several days. I do this in a vac pac bag but cling film will work.
- Slice thinly and serve.
If you vac pack again it will last for a month or more after curing and smoking.
Equipment
Wireless Thermometers
We talked very briefly about wireless thermometers. For now I think you are OK without one. However when you start doing bigger joints of meat one would be very handy. There are two I would recommend at this point:
- ThermaQ Blue – the same make as the Thermapen you have but with Bluetooth connectivity so you can monitor it on your phone. You can use your phone to set alarms and it graphs the cook which I find very useful. These are made in the UK and I sell them. Getting replacement probes is easy.
- ThermoWorks Smoke – the one in the picture and the one I brought with me. This is easy to use and works well. This is a US product. Getting spares is difficult and can be expensive.

Pans with handles that clip on and off
They’re a product from Tefal that I picked up several years ago in France before I got into the Big Green Egg as they were perfect for the camper van. They’re called Tefal Ingenio and are available in the UK now from Amazon.
The handle clips on and off easily so you pop the pan in the Egg and take the handle off. I use mine all the time. They’re great for cooking tarte tatin.
Just be careful with non stick ones that you don’t get them too hot as the non-stick will start to break down.

Pro Q Cold Smoke Generator
If you ever fancied getting into making you own bacon or smoked salmon then buy one of these. They’re as cheap as chips and superb. I use mine all the time, we’ve always got home made bacon and smoked salmon in the fridge.
Tim Hayward’s book, Food DIY, is a great starting place.

Recommended Cook Books
Meathead
This is by Meathead Goldwyn, the man behind the AmazingRibs.com website. It’s got some really good stuff on technique as a well as some good recipes. It’s available on Amazon.

Food DIY
Tim Hayward is a Cambridge based food writer, restauranteur and chef. He’s judged on the BBQ scene. His book contain loads of great curing recipes as well as BBQ stuff. I really love it and use the recipes all the time. It’s available on Amazon.
