The Art or Science of Low and Slow?
One of the most frequently asked questions we get from our customers is 'How do I cook brisket or pulled pork?'. These two dishes seem to be the defining measure of a successful barbecue. Whilst this is one of our least favourite ways to enjoy food cooked on our grills, to master the art of low and slow cooking, it's helpful to understand the science of how meat cooks. Yep, that's right, we need to delve into the science so you understand what is happening as your meat cooks and you achieve the desired consistent delicious results. Let's be honest: when you've invested in a decent joint of meat, which comes at a price of £££, you want to ensure you're not disappointed with the end result.
We'll explain which cuts of meet you need to buy for these low and slow cooks in a separate blog.
So, we're going to explore what happens to meat during low and slow cooks including the 'stall' and how you can manage it.

What happens when meat cooks?
Once we start to heat our meat, several processes take place which change the text and appearance as it cooks:
- Protein Denaturation
- Proteins are long chains of amino acids. As meat heats, the chains unwind and then bond with each other in new ways. This process is called denaturation. It starts around 40°C and speeds up as the temperature rises. Denatured proteins lose their natural structure and begin to firm up, which is why meat transitions from soft to firm when cooked.
For a low and slow cook, there are other factors going on that will see your meat get much softer, and hopefully more moist..
- Proteins are long chains of amino acids. As meat heats, the chains unwind and then bond with each other in new ways. This process is called denaturation. It starts around 40°C and speeds up as the temperature rises. Denatured proteins lose their natural structure and begin to firm up, which is why meat transitions from soft to firm when cooked.
- Collagen Breakdown
- Collagen is a connective tissue that makes tough cuts of meat, e.g. brisket and pork shoulder, chewy. Collagen breaks down into gelatin between 70°C and 82°C, this process tenderises the meat and creates that much sought juicy texture. The process takes extended periods of time though, and often people rush a cook and end up with a tough piece of meat. Give it time and that tough piece of meat will become more tender and moist. The biggest mistake is not over cooking a low and slow piece of meat, it's undercooking it.
- Fat Rendering
- Fat adds flavour and moisture to meat. As temperature rises above 54°C, fat starts to melt, it infuses the meat with flavour. Proper rendering is critical to achieving a succulent, not greasy, dish. Too much fat and it'll be greasy, too little fat and you're dish could be dry.
- Maillard Reaction
- This process takes place above 150°C. The amino acids and reducing sugars react, creating the brown, flavourful crust on grilled and seared meats. So on a low and slow cook you're not going to see much of the maillard reaction, but you will see a bark forming on your meat as the other layers dry, and the rub you've used caramelises.

What is the Stall?
You've probably already experienced the stall without knowing it, if you've previously cooked brisket or pork shoulder. The stall takes place during low and slow cooks; the internal temperature of the meat simply plateaus or stalls! This is where most people will panic the first time they are doing a cook like this, we all do it.
What happens during the stall?
As the meat cooks, moisture inside moves to the surface and evaporates, cooling the surface and counteracting the heat from your grill. It's known as evaporative cooling. Sound familiar, it's similar to how sweating cools your body on a hot day. The heat energy that should raise the internal temperature is instead used to turn surface moisture into steam. This process will hold your meat, normally between 65°C and 75°C, and sometimes you will even see the internal temperature of your meat drop, even though your grill is set way above this temperature.
How long does the stall last?
The 10 million dollar question! You've probably been asked, what time will we be eating? In my experience, the response is I have no idea, it'll be ready when it's ready. This doesn't go down well!
When we ask customers to estimate the duration of a low and slow cook, so many underestimate the total cook time and fall into the usual pitfalls of ramping up the grill temperature or serving before the meat has reached temperature. We've all done it as we learn.
Unfortunately, it's not an exact science and it does depend on a number of factors, including the moisture content of a piece of meat and how much airflow is going through your grill.
Tip: We recommend starting your cook 24 hours before the desired serving time, and when the meat is ready, wrap it in foil, followed by old bath towels and store it in a cool box. It will keep hot for hours without compromising your cook.
How do You manage the stall?
Here's what we've learnt to help you navigate the stall:
- Patience
- If you have plenty of time, simply maintain your cooking temperature, the meat will push through the stall naturally but this can take several hours. I've seen a pork shoulder stall for over nine hours. Beef and brisket in particular tends to have a lower moisture content than a pork shoulder (also called a pork butt), and so will tend to go through the stall more quickly.
- Wrap your Meat (Texas Crutch)
- To speed up your cook, although you'll sacrifice the bark, wrap your joint in foil (pork) or butcher paper (brisket). Wrapping reduces evaporative cooling by trapping in moisture and heat. This process can be called crutching your meat in a recipe.
- Increase Cooking Temperature
- By increasing the cooking temperature from 110°C to 140°C, this helps to accelerate the stall and achieve the desired internal cooking temperature to serve and eat. Just be careful that this does not dry out or overcook the meat. Increasing the temperature will also increase the airflow and, therefore, evaporate the moisture more quickly.
- Add some Water
- Place a pan filled with water in your grill. This increases the humidity, slowing evaporation from the meat's surface. This will only help to reduce the stall duration. I tend to only use this technique with lamb shoulder, where I want to keep in as much moisture as possible.
The graph below shows the process. Here our grill (Big Green Egg) is set at 110°C (225°F). The blue line shows the internal temperature of the meat. Only when the connective tissue has broken down will your meat be moist and succulent. Before then it will be tough and dry.
Time and Temperature Graph for Low and Slow Cooks

Smoking and the Smoke Ring
Barbecue is often referred to as smoking, and that's because traditional American BBQ is done using wood splits (logs). As these burn, they produce smoke (and other chemicals), and the smoke flavours the meats being cooked. Achieving the correct cooking temperature and controlling the flavour is an art. Selecting the right wood source is key to achieving the flavour you are after.
The smoke ring is often thought to be the holy grail of good BBQ. It's a pink outer layer around the cooked meat, just under the bark. Competition judges will look for it.
On a grill such as the Big Green Egg where you are using lumpwood charcoal as your fuel source, you will need to add wood chunks to the charcoal in order to produce smoke, carbon monoxide and nitrogen dioxide.
A quick tip, meat takes on smoke flavour when the meat is cool and wet, therfore at the beginning of the cook. Past about 43°C internal, smoke isn't really going to impact your cook much, so you want your wood chunks to be on the part of the coals that are burning at the start of the cook.
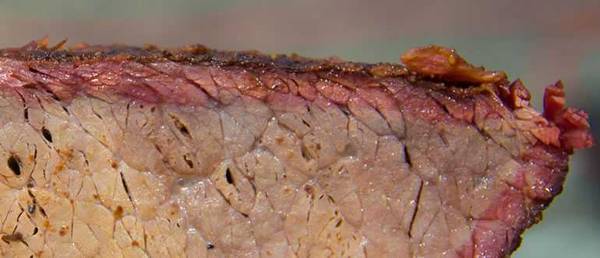
The Smoke Ring
I'm going to dive straight into the science of the smoke ring and debunk a few myths. Let's start with the myths:
- The smoke ring has no flavour, so if you've not got a smoke ring, it's just aesthetics.
- You don't need smoke to create a smoke ring.
- A smoke ring isn't necessarily a sign of good BBQ, but competition judges will look for it!
- You can get a smoke ring in a normal kitchen oven (if you want to), and it will still not taste of anything.
Smoke Ring - the science
A smoke ring is where the myoglobin in meat is set pink. Myoglobin is a protein in the meat that typically will turn from red to brown depending on how much oxygen it is subject to. It will also change colour as it is heated and breaks down; hence, a steak turns from red to brown the more you cook it. Myoglobin stores oxygen for muscles to use as they work, the more oxygen they contain, the brighter red they are.
Some supermarkets pump oxygen over their raw meat on a counter as it will make it brighter red.
How is myoglobin set pink during a cook?
When the myoglobin in meat is subject to nitric oxide (NO) and/or carbon monoxide (CO), it will set it pink. Nitric Oxide is formed when Nitrogen Dioxide (NO2) mixes with water/moisture in the meat. If you have an environment with either of these two gasses, you can get a smoke ring. Both of these gasses are produced when burning wood, which is also when you see the smoke, but the smoke particles are irrelevant to the formation of the smoke ring. They are, however, where the taste comes from.
The reason the smoke ring is only around the outside of the meat is that the gases and nitric oxide produced can only penetrate the very outer layers of the meat. Once again the smoke ring gives no difference in flavour.
Curing salt used for making bacon does precisely the same thing to the myoglobin, setting it pink. Bacon cured with just normal salt (no potassium nitrate) will be grey when cooked as the myoglobin will lose it's pink/red colour.
You could form a smoke ring in a normal oven by using a little bit of curing salt on the outside of your meat, setting the outer layers containing myoglobin to red.
Smoke rings with a Kamado like the Big Green Egg
Because kamado-style grills are so well insulated, the wood chunks you add don't burn super hot and don't produce the same levels of CO2 and NO2. You will, therefore, not get a brilliant smoke ring.
What have you learnt?
By learning a bit of science about how meat cooks and why the cook stalls, you now have some control over your low and slow cooks.
With some patience and newly acquired knowledge, you'll be able to master the art of low and slow cooks with great results.
Here are some of our low and slow recipes:
Don't forget to start your low and slow cook in plenty of time and hold in a cool box; it makes life so much easier.